
Blog
Welcome

This is the blog for professional photographers, and those who aspire to be. Our aim is to help professional photographers build long-term, sustainable careers.
loading facebook page
Recent posts
The new Workspace blogging feature allows you to set up a blog as part of your Workspace website OR send blog posts directly to your Blogger or Wordpress (self hosted) blog. This is a really useful feature as once you've uploaded and sorted images in Workspace, you can immediately post them as a slideshow or storyboard on your blog - making the Workspace workflow even smarter! It's a quick and easy way to get your images out in front of people online. Here's how it works (click on the images to view them larger): First you need to set up the blogging feature. You can do this under the SETTINGS menu in Workspace. Go to 'Blog' in the subnav (on the right) and choose where you want to blog. You can create a new blog using Workspace (you'll have to set up a Workspace website URL first - instructions are here). Or you can choose to send your blog posts from Workspace to a Blogger or Wordpress blog. NB - To publish your blog posts on Wordpress you'll need to use this Plugin so Wordpress can communicate with Workspace. The plugin just needs to be installed and activated - no configuration is required. You can also choose the comment system you want to use so people can leave feedback on your blog posts - either Built-in (default), Facebook, Google+ or Disqus. 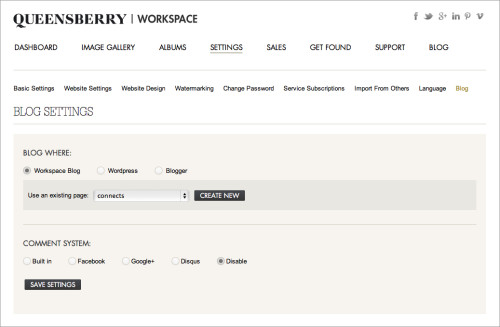 Once you've saved these settings, you're ready to start blogging. You can create a blog post in a number of ways: 1. From the Event window: go to the collection you want to blog and click the blue 'Blog it' Button to create a post that includes an image slideshow of that collection. 2. From the Storyboard window you can blog your storyboard (again by clicking the 'Blog it' button).
 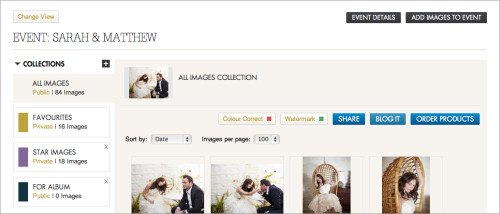 In both these cases, when you click the 'Blog it' button a pop-up window like the one below appears where you can enter a title for your blog post, and introductory and sign-off text. Your slideshow or storyboard will between these text areas.
 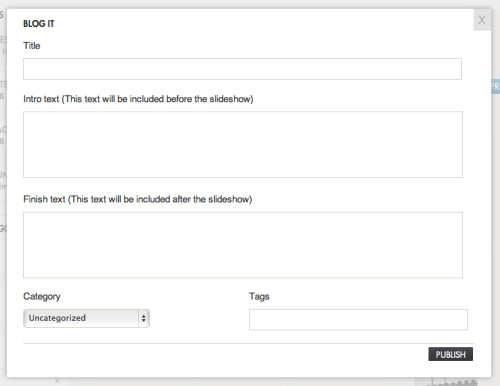 3. The third way to create a blog post is to go to BLOG in the main nav and click 'Create New'.
 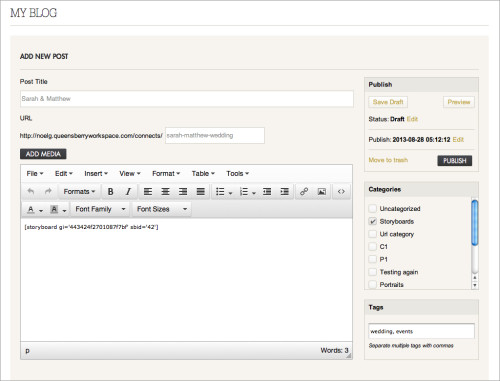 This is the view you'll see if click 'Create New' from the main Blog page and if you edit a blog post. Notice that you have more control over layout and customization. You can edit or delete your blog posts at any time (even after you publish them) by going to BLOG in the main navigation, where you'll find a list of all your blog posts. So what does all this blogging look like on the client end? Your blog will look something like this one featuring a storyboard and it'll be displayed in the same style as your chosen website theme.
 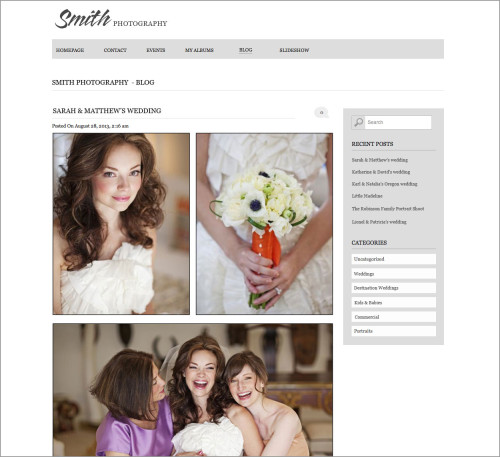 Be brave and give it a go for yourself! Cheers, Anna
 Once you've saved these settings, you're ready to start blogging. You can create a blog post in a number of ways: 1. From the Event window: go to the collection you want to blog and click the blue 'Blog it' Button to create a post that includes an image slideshow of that collection. 2. From the Storyboard window you can blog your storyboard (again by clicking the 'Blog it' button).
  In both these cases, when you click the 'Blog it' button a pop-up window like the one below appears where you can enter a title for your blog post, and introductory and sign-off text. Your slideshow or storyboard will between these text areas.
  3. The third way to create a blog post is to go to BLOG in the main nav and click 'Create New'.
  This is the view you'll see if click 'Create New' from the main Blog page and if you edit a blog post. Notice that you have more control over layout and customization. You can edit or delete your blog posts at any time (even after you publish them) by going to BLOG in the main navigation, where you'll find a list of all your blog posts. So what does all this blogging look like on the client end? Your blog will look something like this one featuring a storyboard and it'll be displayed in the same style as your chosen website theme.
  Be brave and give it a go for yourself! Cheers, Anna
This entry was posted in , by Admin
Email: info@queensberry.com
Free Phone Numbers:
New Zealand: 0800 905 905
Australia: 1800 146 251
USA: +18668350851
UK: 0800 808 5271
Canada: +1 855 581 0370