Blog
Welcome


Recent posts
SEARCH RESULTS FOR: Family

What does a photographer do when their client wants something ‘a bit different’ for their wedding day? Ask Steve and Heidi of Aim 2 Please Photography. That’s exactly what they were asked by Katherine and Steve who were married at a stunning golf course resort north of Toronto on a warm spring day. The bride and groom were married by the bride's Grandparents, who are both members of the Salvation Army, then headed off to several locations around the resort where Steve and Heidi has set specific shots up. They posed with chairs in a grassy field, under a white canopy bed and set up a shoot To View More >>
This entry was posted in by Admin
Wading through our "how-to" posts was quite a job. Trying to single out the best was just as difficult, but worth the effort. Here are my favourites. Hopefully you'll find them handy when dealing with Queensberry and Photojunction, and evaluating your own workflow... There's so much good stuff in the Smooth Sailing series I reckon you should check them all, but here are a few: Photo Front covers (easy peasy) - If designing Photo Front covers sounds hard. It's not. Here's how to easily do it. What can delay your orders? - Here are a few simple things that frequently delay people's orders (long To View More >>
This entry was posted in by Admin

Heading back to where they first met, Stephanie and Adam married in the hilly pastures of rural Berkshires, just west of Massachusetts. Their naturally beautiful day was captured by Danielle Zielinski . They chose a remote farm as the perfect venue and married on a grassy knoll under a cherry tree; then shared drinks on the lawn, and celebrated at their reception in the barn. Danielle’s brief was to capture the natural, unstructured beauty of the day – and it was this style that inspired the design of the album, and presentation of the photographs. A Rimu timber cover set the natural tone To View More >>
This entry was posted in by Admin

We know the feeling – you know there must be a way to do something, but you just can't figure it out. Here's an example: there's no standard "title" aperture in PJ Remix, so how do you add a title? There are actually two ways to do it. The easier way (but maybe also easier to get wrong) is simply this: Add a blank aperture to the layout using the Add button (left image, above) Change the aperture to Customise (right image, above) Uncheck the Constrain Proportions box and enter the values directly. Easy as long as you remember the values: 112 wide by 200 high , as above. Whether you use To View More >>
This entry was posted in by Admin

Michael and Anna Costa have been touring the US over the past few months sharing their secrets at PUG conferences and events. We're their preferred album supplier so we designed an 18x12 Duo for them to take on tour. The objective was to demonstrate the value of differentiation: how great presentation can help you stand out and build your studio profile. So how did it go? We received this note from them: "I wanted to tell you the album is drop dead gorgeous. The hundreds of people that saw it absolutely loved it! It couldn't have got a better response. "There’s just nothing quite like a Queensberry To View More >>
This entry was posted in Uncategorized by Admin

Photography by David Jay Seth Godin said recently , 'If you want to build a brand for the ages, you need to stand for something today, and tomorrow, and every day.' Among other things, we stand for quality, which is why the prints on our digital pages are split at the centreline, leaving a gap of about 2mm (about 1/16”). Some people might not like the look, but we can't compromise products designed to last for generations. Actually, there are two reasons for this: more flexibility as to what equipment you can print on, and because the fold in the print almost invariably discolours and/or cracks. To View More >>
This entry was posted in by Admin

Melanie and Neil were married on 07/07/07, possibly one of the luckiest days in a hundred years, so Melissa Worthington couldn’t help but laugh when she saw a lucky penny laid out for the sole of Melanie’s shoe – a Southern tradition. The couple married in the quaint town of Onancock, where Melanie grew up, on Virginia’s Eastern Shore. Melanie’s history runs deep within the town, and they chose to celebrate family history and small town tradition to make the day unique: the reception was held in a mansion once owned by the doctor who delivered Melanie's grandmother. Melissa and Sam were To View More >>
This entry was posted in Uncategorized by Admin
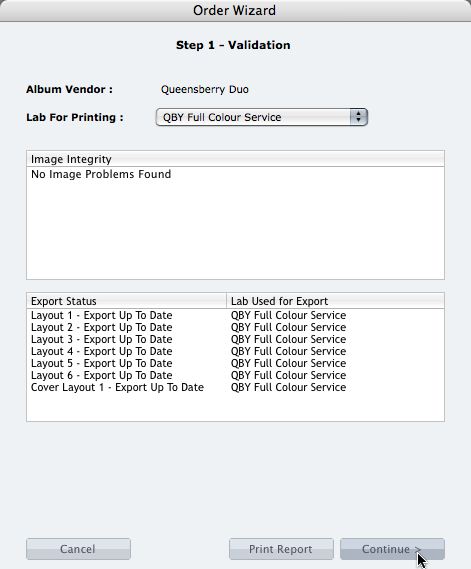
We're describing the perfect way to send us your print-and-bind order... After exporting your files you definitely shouldn't jump straight to LabFTP and send us the files - we wouldn't know what to do with them! Instead, always use the Remix Order Wizard. (You'll find it under the Album menu). Remix will validate your order and create an order "bundle" that contains everything we'll need to process your order - provided you follow these instructions: 1. Run your order through the Send Order Wizard. You'll find a tutorial here. The Wizard will ask what service you want (eg Print & Assemble) To View More >>
This entry was posted in by Admin
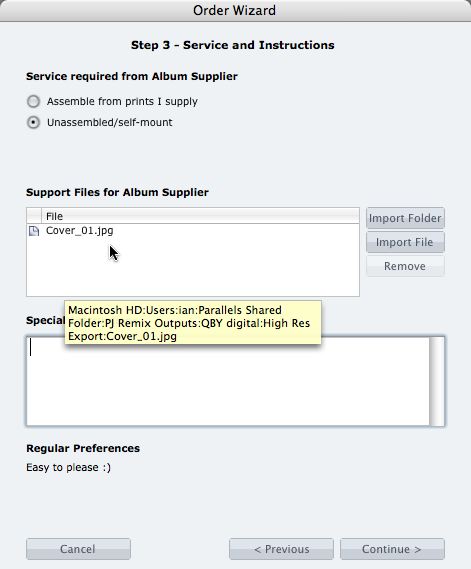
What if you want us to print your cover image, but nothing else? 1. When you fire up the Remix Order Wizard , choose either the "Assemble From Prints Supplied" or Don't Assemble" option. 2. On the same screen the Wizard will offer a place to include "support files" for your album supplier. Open your folder of High-Res Export files and drag in a copy of the cover image (don't double up by sending it to your lab to print as well). 3. Remix may ask you if you want us to print the cover image (generally it'll be obvious what you want, in which case Remix won't ask). Be sure to say Yes. 4. When the To View More >>
This entry was posted in by Admin

Cover layout design in PJ Remix Here are the first steps in preparing a perfect, hassle-free print-and-bind order, really fast. 1. First, upgrade to PJ Remix. If you have already, thank you. 2. Use Remix to design your cover as well as your page layouts. You'll get to frame and crop the cover image yourself, see exactly what it looks like and be sure that it looks good. For example, here you can see how much of the image in the photo front cover layout above has been cropped away. No problem in this case, but many images won't be suitable: 3. Export your cover AND page layouts using Remix's Export To View More >>
This entry was posted in by Admin